Jeremy W. Langston

Personal Website

Category: Metalworking (page 1 of 2)

Portable Console Emulator using a Raspberry Pi

Here’s a couple pictures from my last project:  tablet-based teleprompter with 15mm support rods and a quick disconnect camera system.  It turned out very well.  One of these days I’ll post up some more detail.

image image


But that project’s over and my shop is missing me.  This time I’m getting back to electronics.  Lately I’ve been playing the old NES games.  Well, when I say playing, I mean with my original NES.  I left a cartridge in the console the last time I played it and all of the pins got stressed, resulting in the blinking display.  This is typical when the pins connecting to the cartridge don’t make a good connection.  Bending them back was an easy fix, and didn’t even require the removal of the security chip.

Anyways, now I’m trying to make a portable system based on a Raspberry Pi.  Having installed the RetroPie distribution, running NES/SNES/Genesis/etc. emulators are a breeze.  I bought a few other components to make sure everything would work, and then started designing.

Portable Console v3 - 1Portable Console v3 - 2

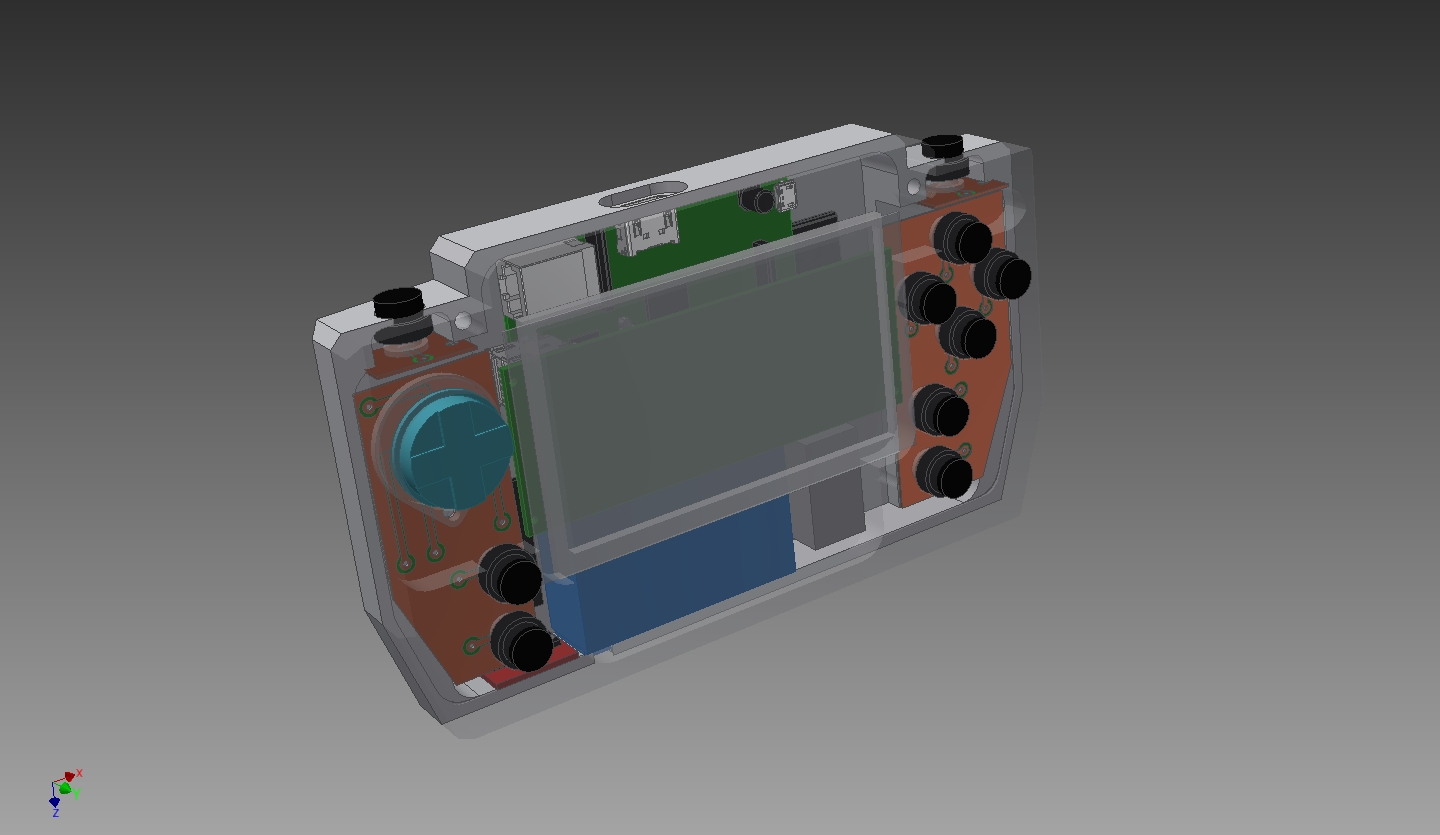
Here’s what I’ve come up with.  I went through several revisions, trying to maximize space and portability.  At the same time, I tried to keep ergonomics in mind.  The size is a bit chunky, but feels good in the hand so far.  The enclosure is made of two pieces of polypropylene.  Originally I wanted it all milled out of solid aluminum.  Not wanting to spend 500 hrs making billions of passes milling, I chickened out for something much easier to machine (set RPMs low and make heavy cuts).

The parts I’m using are, mostly, shown below:  a Raspberry Pi, a 12V-5V switching regulator from eBay, a 4.3″ TFT car monitor from Amazon, a 12V LiPo battery with integrated charging and power switch components from eBay, and the little silicon pads from a Logitech Gravis Gamepad Pro that doesn’t work.  Oh, and a Teensy v3 to make the gamepad portion.

image


Since I’m splitting up the buttons from a traditional gamepad with the monitor in the middle, I needed some custom PCBs.  Gamepads work by closing circuits to ground via silicon pads with bits of carbon in it.  I could use some pushbuttons, but wanted to retain the nice action of a gamepad button.  Once I got the dimensions and button positions from Inventor, I made the PCB layout in DipTrace.  Then I used the tried and true laser toner, copper clad PC board, and ferric chloride PCB solution.  It took a few tries, but I like the results.

image  image

The 4.3″ TFT monitor is a great deal for $18.  I just need to make some changes to get it how I wanted.  First was to remove the case and hardwire the power to the battery and to the regulator.  Next I needed to remove the pushbuttons on the back of the monitor.  Eventually I’d like to control them via my Teensy microcontroller because they bring up the menu for setting things like brightness, etc.

image  image

When I first got the regulator I was a bit suspicious since it looked like there was a big glob of solder bridging a couple nodes.  Metering it all out it appears OK.

image  image


I then hardwired power and NTSC video directly to the Raspberry Pi.  The main regulator pads were the best place to supply 5V and bypass the USB port.

image  image

Lastly I started fabricating the front of the enclosure.  I’ve got about 8 hrs into it now and haven’t made any mistakes – yay!  Unfortunately I ran out of polypropylene and had to put in a new order.  In the meantime, I am going to make the buttons.  Well, that’s all for now…


Sawbot Update 1

I spent some time the other day modeling the HF 18V Circular Saw motor and bracket.  Since I don’t have the money for pro CAD programs, I use Google Sketchup.  Great product for free, and it’s very simple to use.  The most time I spend modeling is just using the calipers, rechecking, and then checking again.  I’ve posted the sketch to the Sketchup Warehouse.

HF 18V Circular Saw Motor

While modeling it, I’ve been thinking about how to mount it.  There aren’t any easy flat faces and the cast aluminum is only about 0.1″ thick.  Several options are available.  I could mill the front face flush and machine an aluminum mounting plate for it to mount to.  This isn’t my preferred choice because it could easily break and I’d be hosed.  Another option is to make a similar mounting plate without milling the current bracket.  That’s the easiest way out, and I haven’t completely decided against it.  The four deep holes on the corners could be threaded or just put a bolt and nut to it.  Since there isn’t a lot of material there, helicoils wouldn’t be an option, but there’s a full inch to bite onto so…I don’t know yet.

Another option is to make a custom bracket that would mate directly with the black plastic gear casing.  The longer I look at it, the easier it looks to do.  Here’s a closer look at what is actually inside.

As you can see, the current bracket houses a 6000RS series ball bearing.  I’m sure it’s there to stay, so I’d have to buy another if I remade it.  Over the next few days I will update my model to show these parts.  If you were wondering what the oddly shaped part was that rides on the shaft, it’s a locking mechanism for holding the shaft when you are changing blades on the saw.  Here’s the product manual showing an exploded parts list.

Edit:

I’ve redrawn the motor, bracket, and other inside goodness, and posted it to the Sketchup Warehouse.  The planetary gears aren’t drawn because I’m lazy.  Here’s an exploded view:

HF 18V Circular Saw Motor - Modeled Exploded View

Glacern GSV-440

My new vise came in the mail today!  It’s a Glacern GSV-440 4″ Vise.  A vise is not one of those things things I wanted to skimp on, as I’ve seen the Chinese junk.  Sure you can still make good stuff with one of the junkers.  However,  I don’t want to spend a lot of time just getting my vise to function as a vise.  At $224, the GSV-440 isn’t cheap, but it’s a whole lot less than similarly sized Kurt’s.  I went with the 4″ thinking that the 5″ and 6″ would be too large for the G0704 – and I think the 4″ is a perfect fit.

Removing the safety guard on the Grizzly G0704 Mill

I’ve only used  my mill briefly and already noticed that the safety guard on my G0704 mill just had to go.  Basically it works by pressing a switch when the guard is flipped out, causing the mill to stop.  Good idea, but the plastic guard gets in the way.  So, here’s the easiest way of removing the guard without having to splice anything.

IMAG0082

Step 1) Remove the snap ring on the top of the guard.

IMAG0083

Step 2) Remove the two hex bolts holding the switch housing to the head.

IMAG0091

Step 3)  Take out the set screw holding the guard to the switch housing.  Careful – nothing is really holding the guard up.

IMAG0098

IMAG0104

Here you can see how it actually works.  Behind the paper strip is a micro-switch.  When the guard is flipped out, the switch presses in.

IMAG0099

Step 4)  Flip the guard open and pull straight down until it comes out.  Finally bolt the switch housing back onto the head and you’re done.

IMAG0102

Grizzly G0704 Milling Machine has arrived!

image

Three months later the mill finally makes it off a slow boat from China to my doorstep. Over 300lbs, getting this thing into the backyard with my shed might have to wait a bit. It’s been raining so much that it might get bogged down in mud. That ought to give me time to figure out how to lift it onto its stand…

UPDATED 6/25/2010:

I finally found the time to uncrate the mill and clean it up.  As with other machinery shipped overseas from China, a protecting coat of wax was applied to the unpainted metal.  I used Purple Power, an engine grease solvent, undiluted, and scrubbed away the red wax.  This included the table, handles, dovetails, and other places that were accessible.  I didn’t do a tear-down because I didn’t want to risk the chance of not getting it back together perfectly.  The stand comes pre-assembled, with the exception of the chip tray that sits between the mill and the stand.  The mill, tray, and stand all have 4 mounting holes to hold everything together.  There are also areas at the feet for mounting the stand to the floor.  I haven’t made it to this point yet.  Maybe in the next week or two when I get an extra hand it will finally be together.  Since the cost of the milling machine is about half of the overall cost of ownership (cutters, tool-holding, etc.), I can’t use it just yet.

IMAG0033

Older posts

© 2024 Jeremy W. Langston

Theme by Anders NorenUp ↑